
These Chef recipes are no longer maintained or supported.
Please see/use Chef for ClusterControl
In the next following sections I will walk you through using Chef to deploy a MySQL Galera cluster on EC2 and then monitor and manage it using Severalnines's ClusterControl.
In the end we should have 5 nodes deployed:
* 1 Node with Chef Server and serving also as a Chef workstation using Chef v0.10.8
* 3 Nodes running MySQL Galera v5.5.23.6
* 1 Node running ClusterControl v1.1.28
The distribution used for the EC2 nodes in this post is Ubuntu Server 11.10 and the Chef version used is 0.10.8.
While these recipes have been tested primarily on Debian/Ubuntu distributions they have been written with RHEL/Centos support in mind as well however less tested on though.
We'll first setup a node with Chef Server and Severalnines's cookbook repository then prepare an EC2 image installed with Chef Client that is setup to connect to our Chef Server. If you already have a Chef environment then you can of course skip to the 'Install MySQL Galera' section.
Then last we'll create a copule of data bags and set roles for our nodes which specifies which reciepes to run on our nodes.
Download Severalnines cookbook repository and install Chef Server
First we'll launch a new Ubuntu Server 11.10 EC2 instance, install git and then clone Severalnines's github cookbook.
Logon to your new EC2 instance and get the cookbook repository.
$ ssh -i <my_aws_key.pem> ubuntu@<public ec2 ip>
$ sudo apt-get -y install git
$ git clone git://github.com/severalnines/S9s_cookbooks.git cookbooks
There are already excellent instructions on how to setup a Chef server on different distributions over at Opscode and for detailed instructions please following the link here, http://wiki.opscode.com/display/chef/Installing+Chef+Server
Or if you are using an debian/ubuntu based distribution use below bootstrap script. It's also in the Seveveralnines's cookbook repo.
So either do
$ cookbooks/bootstrap-chef-server.sh
which is same as below
#!/usr/bin/env bash
echo "deb http://apt.opscode.com/ `lsb_release -cs`-0.10 main" | sudo tee /etc/apt/sources.list.d/opscode.list
sudo mkdir -p /etc/apt/trusted.gpg.d
gpg --keyserver keys.gnupg.net --recv-keys 83EF826A
gpg --export packages@opscode.com | sudo tee /etc/apt/trusted.gpg.d/opscode-keyring.gpg > /dev/null
sudo apt-get -y update
sudo apt-get -y install opscode-keyring
sudo apt-get -y upgrade
sudo apt-get -y install chef chef-server
mkdir -p ~/.chef
sudo cp /etc/chef/validation.pem /etc/chef/webui.pem ~/.chef
sudo chown -R $USER ~/.chef
knife configure -i
This will install Chef Server and configure Chef's command line client knife on the same node so that you can upload and manage the recipes. This node will also serve as our Chef workstation but you can install Chef Client/knife on another server if you like (http://wiki.opscode.com/display/chef/Installing+Chef+Server+on+Debian+or+Ubuntu+using+Packages
).
Since we're also installing the Chef Client tools on this host you will be prompted for a Chef Server URL and should just enter 'none' and also 'knife configure -i' will prompt your for input.
...
 output from 'knife configure -i'
 ...
 WARNING: No knife configuration file found
 Where should I put the config file? [/home/ubuntu/.chef/knife.rb]
 Please enter the chef server URL: [http://ip-10-245-66-151.ec2.internal:4000] http://localhost:4000
 Please enter a clientname for the new client: [ubuntu] chef_ws
 Please enter the existing admin clientname: [chef-webui]
 Please enter the location of the existing admin client's private key: [/etc/chef/webui.pem] .chef/webui.pem
 Please enter the validation clientname: [chef-validator]
 Please enter the location of the validation key: [/etc/chef/validation.pem] .chef/validation.pem
 Please enter the path to a chef repository (or leave blank): /home/ubuntu
 Creating initial API user...
 Created client[chef_ws]
 Configuration file written to /home/ubuntu/.chef/knife.rb
Check if 'knife' is setup correctly.
$ knife client list
chef-validator
chef-webui
chef_ws
Setup Chef Client on 3 nodes
It's simplest to first setup a single node properly with Chef Client and then create an EC2 image from it and launch the rest of the required nodes. Either use below script or knife to boostrap the node(s), http://wiki.opscode.com/display/chef/Knife+Bootstrap
#!/usr/bin/env bash
echo "deb http://apt.opscode.com/ `lsb_release -cs`-0.10 main" | sudo tee /etc/apt/sources.list.d/opscode.list
sudo mkdir -p /etc/apt/trusted.gpg.d
gpg --keyserver keys.gnupg.net --recv-keys 83EF826A
gpg --export packages@opscode.com | sudo tee /etc/apt/trusted.gpg.d/opscode-keyring.gpg > /dev/null
sudo apt-get -y update
sudo apt-get -y install opscode-keyring
sudo apt-get -y upgrade
sudo apt-get -y install chef
When prompted use the Chef Server's private IP address for the Chef URL, e.g., http://<ip-private-chef-chef>:4000
You also need to copy over the Chef Server's /etc/chef/validation.pem file to the Chef Client node's /etc/chef/ directory.
Then restart the Chef client.
$ sudo /etc/init.d/chef-client restart
**NOTE 1:** When you launch several instances from the same Chef Node AMI you need to delete /etc/chef/client.pem if it already has been registed for a node. Each new node requires its own client.pem file.
Just delete it and do a '/etc/init.d/chef-client restart' to register the node and create a new client.pem file.
**NOTE 2:** One problem using EC2 instances is that the private IP addresses are dynamic and in order for a galera node to handle a reboot you need to setup some kind of DNS solution like the one described in this post,
http://www.ducea.com/2009/06/01/howto-update-dns-hostnames-automatically-for-your-amazon-ec2-instances/
This post will not go over this particular issue.
Verify that the nodes have pinged the Chef Server by:
$ knife node list
You should see a list of your nodes.
Install MySQL Galera
We should now have 1 node with Chef Server running and 3 bare bone nodes with Chef Client running. The next step is to create a data bag and upload the cookbook.
By default the root MySQL password used will be 'password' which you can change by editing the cookbook's attributes directly or by setting overrides in a role which we'll create later. You might also want to set a stricter grant for the "wsrep user" which as default is set to "GRANT ALL ON *.* TO 'wsrep_sst'@'%' IDENTIFIED BY 'wsrep' ". You can do this by changing the server.rb recipe in the galera cookbook.
Upload the galera cookbook:
$ knife cookbook upload galera
Uploading galera [0.1.0]
Uploaded 1 cookbook.
Check if it's uploaded:
$ knife cookbook list
galera 0.1.0
Next step is to create a data bag that the galera recipes use which is named s9s_galera.
$ knife data bag create s9s_galera
And then upload the data bag items.
Sample s9s_galera data bag below:
$ cat cookbooks/galera/data_bags/s9s_galera/config.json
 {
   "id": "config",
   "mysql_wsrep_tarball_x86_64": "mysql-5.5.23_wsrep_23.6-linux-x86_64.tar.gz",
   "mysql_wsrep_tarball_i686": "mysql-5.5.23_wsrep_23.6-linux-i686.tar.gz",
   "galera_package_i386": {
     "deb": "galera-23.2.2-i386.deb",
     "rpm": "galera-23.2.2-1.rhel5.i386.rpm"},
   "galera_package_x86_64": {
     "deb": "galera-23.2.2-amd64.deb",
     "rpm": "galera-23.2.2-1.rhel5.x86_64.rpm"
   },
 "mysql_wsrep_source": "https://launchpad.net/codership-mysql/5.5/5.5.23-23.6/+download",
 "galera_source": "https://launchpad.net/galera/2.x/23.2.2/+download",
 "sst_method": "rsync",
 "init_node": "192.168.122.12",
 "galera_nodes": [
   "192.168.122.12",
   "192.168.122.14",
   "192.168.122.16"
   ],
  "secure": "yes",
  "update_wsrep_urls": "no"
 }
There are only two keys that you should need to change from the sample.
* init_node
This is the node that initializes the cluster and which the rest of the joining nodes should connect to initially to join the cluster.
* galera_nodes
These are the IP addresses where you have MySQL Galera nodes running and are used to set the wsrep_urls in the my.cnf file.
Let's upload the data bag:
$ knife data bag from file s9s_galera cookbooks/galera/data_bags/s9s_galera/config.json
Updated data_bag_item[s9s_galera::config]
And also let's create a galera role that we can use for the nodes.
$ cat cookbooks/roles/cc_galera.rb
name "cc_galera"
description "MySQL Galera Node"
run_list "recipe[galera::server]"
A single recipe galera::server will be used to install a MySQL Galera server on the node.
Upload to chef:
$ knife role from file cookbooks/roles/cc_galera.rb
Updated Role cc_galera!
Finally we can add this newly created galera role onto our galera nodes.
$ knife node run_list add ip-galera-1-ec2.internal "role[cc_galera]"
run_list: role[cc_galera]
$ knife node run_list add ip-galera-2.ec2.internal "role[cc_galera]"
run_list: role[cc_galera]
$ knife node run_list add ip-galera-3.ec2.internal "role[cc_galera]"
run_list: role[cc_galera]
If we're lucky you should have a running galera cluster soon and if you're impatient you can restart the Chef client on the nodes so that they're downloading the new run list immediatly.
To verify that the cluster is up and running logon to an arbitrary galera node and issue the following:
mysql -uroot -ppassword -e "show status like '%wsrep%'"
You should see that the status variables wsrep_ready is on/1 and wsrep_cluster_size is 3.
Install ClusterControl
This node will serve as our mangement and monitoring node and in the next following steps we'll upload a cookbook, create a data bag and assign roles to our nodes.
Upload the cmon cookbook:
$ knife cookbook upload cmon
Uploading cmon [0.1.0]
Uploaded 1 cookbook.
Next step is to create a data bag that the cmon recipes use which is named s9s_controller.
$ knife data bag create s9s_controller
Sample s9s_controller data bag below:
$ cat cookbooks/cmon/data_bags/s9s_controller/config.json
 {
   "id": "config",
   "controller_host_ipaddress": "192.168.122.30",
   "mode": "controller",
   "type": "galera",
   "cmon_tarball_x86_64": "cmon-1.1.27-64bit-glibc23-mc70.tar.gz",
   "cmon_tarball_i686": "cmon-1.1.27-32bit-glibc23-mc70.tar.gz",
   "cmon_tarball_i386": "cmon-1.1.27-32bit-glibc23-mc70.tar.gz",
   "cmon_source": "http://www.severalnines.com/downloads/cmon",
   "cc_pub_key": "",
   "agent_hosts": [
     "192.168.122.12",
     "192.168.122.14",
     "192.168.122.16"
   ]
 }
There are only three keys that you should need to change from the sample.
* controller_host_ipaddress
This is the IP address of the ClusterControl controller.
* type
This is the cluster type and is set to **galera** since we're handling a galera cluster. Other cluster deployments that ClusterControl supports are 'replication' and 'mysqlcluster'.
* cc_pub_key
The controller recipe will generate a ssh key and this is the place holder to paste in its public key.
The agent nodes will stored the public key in the authorized_keys file in order for the controller to access the nodes properly.
* agent_hosts
A list of IP addresses where the ClusterControl's agents are to deployed.
Let's upload the data bag:
$ knife data bag from file s9s_controller cookbooks/cmon/data_bags/s9s_controller/config.json
Updated data_bag_item[s9s_controller::config]
And let's create a few ClusterControl roles that we can use for the nodes.
The ClusterControl controller role:
$ cat cookbooks/roles/cc_controller.rb
name "cc_controller"
description "ClusterControl Controller"
run_list ["recipe[cmon::controller_mysql]", "recipe[cmon::controller_rrdtool]", "recipe[cmon::controller]"]
The ClusterControl agent role:
$ cat cookbooks/roles/cc_agent.rb
name "cc_agent"
description "ClusterControl Agent"
run_list ["recipe[cmon::agent_packages]", "recipe[cmon::agent]"]
override_attributes({
  "cmon_mysql" => {
     "install_dir" => "/usr/local",
     "mysql_bin" => "/usr/local/mysql/bin/mysql",
     "root_password" => "password"}
})
Here we need to set 3 overrides because the galera cookbook installs the MySQL server under /usr/local. Also if the root password has changed from the default used then this is a good place to make sure the recipe uses the new password.
The web application role:
$ cat cookbooks/roles/cc_webapp.rb
name "cc_webapp"
description "ClusterControl Web Application"
run_list ["recipe[cmon::webserver]", "recipe[cmon::webapp]"]
Upload the roles to chef:
$ knife role from file cookbooks/roles/cc_controller.rb
Updated Role cc_controller!
$ knife role from file cookbooks/roles/cc_agent.rb
Updated Role cc_agent!
$ knife role from file cookbooks/roles/cc_webapp.rb
Updated Role cc_webapp!
For the ClusteControl's controller node we'll apply two roles, one is the cc_controller and the other cc_web since we would like to have the web application installed as well.
$ knife node run_list add ip-controller-ec2.internal "role[cc_controller]"
$ knife node run_list add ip-controller-ec2.internal "role[cc_webapp]"
Before adding the agent roles we'll wait until the controller node is up and running. This is only in order
to grab the public ssh key (/root/.ssh/id_rsa.pub) that we need to paste into our s9s_controller data bag (cc_pub_key) and then re-upload to chef so that the agents can get a hold of it.
After that we can continue by finally deploying the agent recipes on our galera nodes.
Add the cc_agent to our deployed galera nodes.
$ knife node run_list add ip-galera-1-ec2.internal "role[cc_agent]"
$ knife node run_list add ip-galera-2.ec2.internal "role[cc_agent]"
$ knife node run_list add ip-galera-3.ec2.internal "role[cc_agent]"
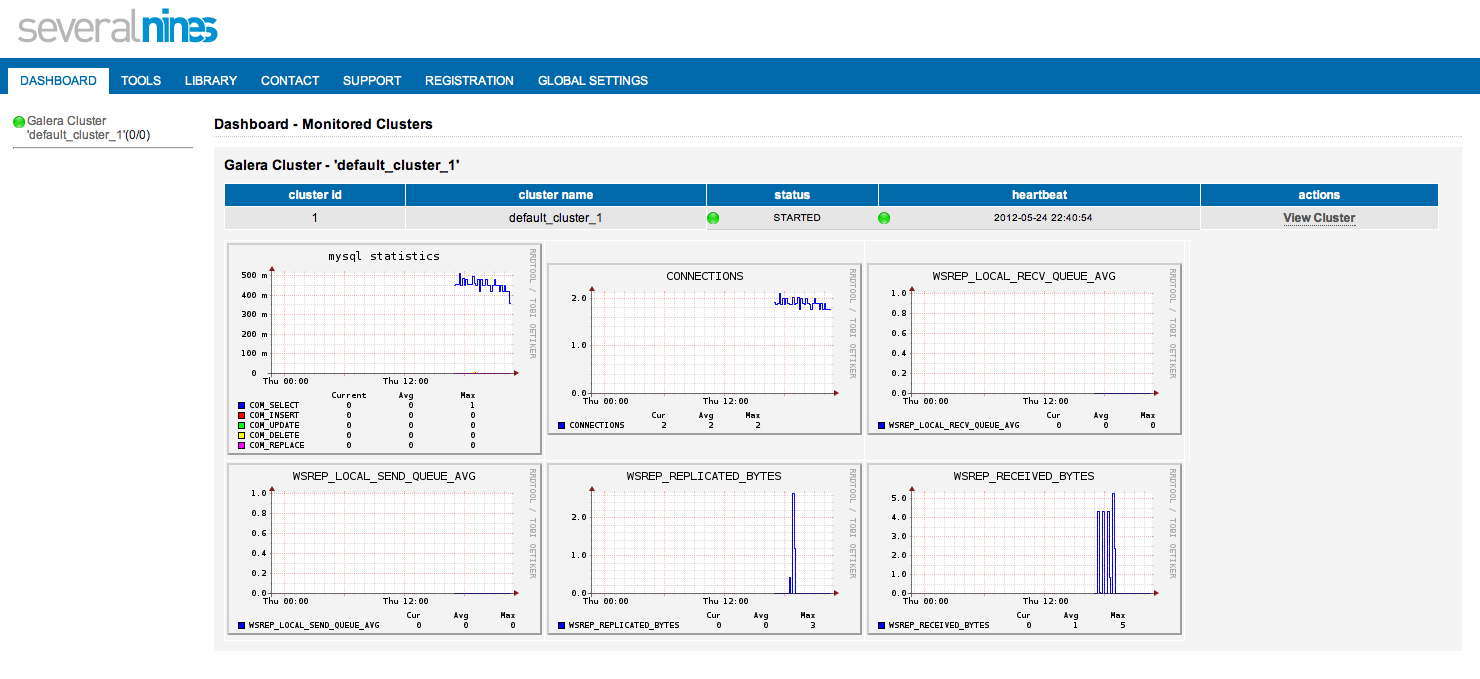
If all went well then we should be able to see our cluster by going to the web application on http://ip-controller-ec2.internal/cmon

Comments
0 comments
Please sign in to leave a comment.